查阅AirSim的文档可知,AirSim支持通过simSetDistortionParams设置K1, K2, K3, P1, P2这5个畸变系数。UE镜头畸变模拟:OpenCV Lens Distortion一文提及过,Unreal的OpenCV Lens Distortion插件是通过生成的Post Process Material对UV坐标施加偏移来模拟镜头畸变。那么,AirSim又是如何处理的呢?
基本流程探究
打开任意集成了AirSim插件的Unreal工程,用Visual Studio翻阅工程源码,重点是AirSim插件的cpp代码。
在整个项目中搜索simSetDistortionParams,找到RPC客户端和服务端的实现。客户端:
// <path-to-project>\Plugins\AirSim\Source\AirLib\src\api\RpcLibClientBase.cpp
void RpcLibClientBase::simSetDistortionParam(const std::string& camera_name, const std::string& param_name, float value, const std::string& vehicle_name, bool external)
        {
            pimpl_->client.call("simSetDistortionParam", camera_name, param_name, value, vehicle_name, external);
        }
服务端:
// <path-to-project>\Plugins\AirSim\Source\AirLib\src\api\RpcLibServerBase.cpp
// 省略其余binding...
pimpl_->server.bind("simSetDistortionParam", [&](const std::string& camera_name, const std::string& param_name, float value, const std::string& vehicle_name, bool external) -> void {
            getWorldSimApi()->setDistortionParam(param_name, value, CameraDetails(camera_name, vehicle_name, external));
        });
// ...
顺藤摸瓜,找到WorldSimApi::setDistortionParam:
void WorldSimApi::setDistortionParam(const std::string& param_name, float value, const CameraDetails& camera_details)
{
APIPCamera* camera = simmode_->getCamera(camera_details);
UAirBlueprintLib::RunCommandOnGameThread([camera, ¶m_name, &value]() {
camera->setDistortionParam(param_name, value);
},
true);
}
再看APIPCamera::setDistortionParam:
void APIPCamera::setDistortionParam(const std::string& param_name, float value)
{
    distortion_param_instance_->SetScalarParameterValue(FName(param_name.c_str()), value);
}
查看APIPCamera类的声明,重点关注带“distortion”字样的成员:
// <path-to-project>\Plugins\AirSim\Source\PIPCamera.h
UCLASS()
class AIRSIM_API APIPCamera : public ACineCameraActor //CinemAirSim
{
// 省略了其余代码...
private:
	UPROPERTY()
    TArray<USceneCaptureComponent2D*> captures_;
    // ...
	UPROPERTY()
    UCineCameraComponent* camera_;
    // ...
    UPROPERTY()
    TArray<UMaterialInstanceDynamic*> distortion_materials_;
    UPROPERTY()
    UMaterial* distortion_material_static_;
    // ...
};
可以猜测AirSim也是通过设置Post Process Material来模拟的畸变。查找distortion_materials_和distortion_material_static_的引用,找到:
void APIPCamera::setDistortionMaterial(int image_type, UObject* outer, FPostProcessSettings& obj)
{
    UMaterialInstanceDynamic* distortion_material = UMaterialInstanceDynamic::Create(distortion_material_static_, outer);
    distortion_materials_[image_type + 1] = distortion_material;
    obj.AddBlendable(distortion_material, 1.0f);
}
再查找的引用,找到:
void APIPCamera::setupCameraFromSettings(const APIPCamera::CameraSetting& camera_setting, const NedTransform& ned_transform)
{
    // ...
    for (int image_type = -1; image_type < image_count; ++image_type) {
        const auto& capture_setting = camera_setting.capture_settings.at(image_type);
        // ...
        if (image_type >= 0) { //scene capture components
            // ...
            switch (Utils::toEnum<ImageType>(image_type)) {
            case ImageType::Scene:
            case ImageType::Infrared:
                updateCaptureComponentSetting(captures_[image_type], render_targets_[image_type], false, pixel_format, capture_setting, ned_transform, false);
                break;

            case ImageType::Segmentation:
            case ImageType::SurfaceNormals:
                updateCaptureComponentSetting(captures_[image_type], render_targets_[image_type], true, pixel_format, capture_setting, ned_transform, true);
                break;

            default:
                updateCaptureComponentSetting(captures_[image_type], render_targets_[image_type], true, pixel_format, capture_setting, ned_transform, false);
                break;
            }
            setDistortionMaterial(image_type, captures_[image_type], captures_[image_type]->PostProcessSettings);
            // ...
        }
        else { //camera component
            // ...
            setDistortionMaterial(image_type, camera_, camera_->PostProcessSettings);
            // ...
        }
    }
}
即在读取配置文件设置相机的阶段,AirSim从distortion_material_static_创建材质,并设置为capture_和camera_的Post Process Material。上文的猜测没错,AirSim的确也是通过Post Process Material模拟的镜头畸变。
材质探究
既然是固定加载distortion_material_static_,那它对应什么材质?distortion_param_instance_的参数又是如何与之关联的?
先看distortion_material_static_的加载:
APIPCamera::APIPCamera(const FObjectInitializer& ObjectInitializer)
    : Super(ObjectInitializer
                .SetDefaultSubobjectClass<UCineCameraComponent>(TEXT("CameraComponent")))
{
    // ...
    static ConstructorHelpers::FObjectFinder<UMaterial> dist_mat_finder(TEXT("Material'/AirSim/HUDAssets/CameraDistortion.CameraDistortion'"));
    if (dist_mat_finder.Succeeded()) {
        distortion_material_static_ = dist_mat_finder.Object;
        distortion_param_collection_ = Cast<UMaterialParameterCollection>(StaticLoadObject(UMaterialParameterCollection::StaticClass(), NULL, TEXT("'/AirSim/HUDAssets/DistortionParams.DistortionParams'")));
    }
    else
        UAirBlueprintLib::LogMessageString("Cannot create distortion material for the PIPCamera",
                                           "",
                                           LogDebugLevel::Failure);
	// ...
}
即distortion_material_static_对应的是/AirSim/HUDAssets/CameraDistortion.CameraDistortion,distortion_param_instance_的参数则来自/AirSim/HUDAssets/DistortionParams.DistortionParams。
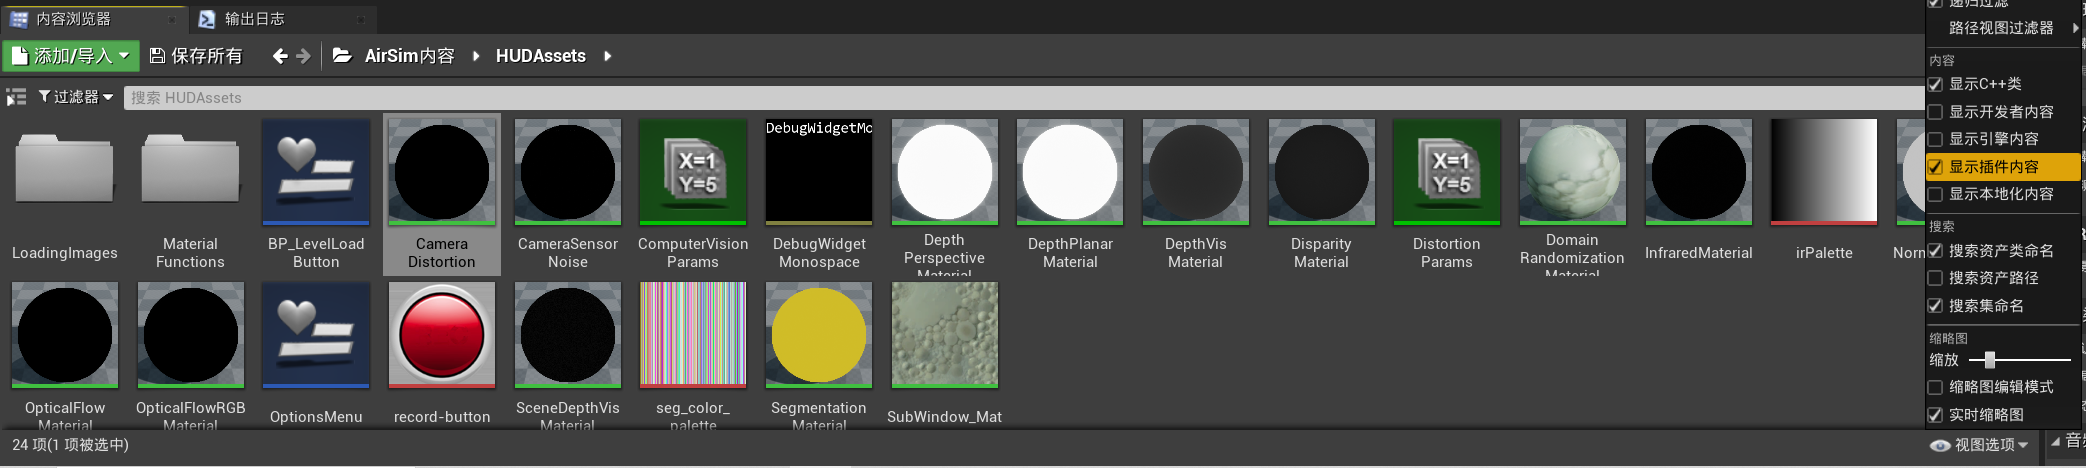
在Unreal Editor的内容浏览器中,点击“视图选项”,勾选“显示插件内容”。找到AirSim的CameraDistortion.CameraDistortion资产:
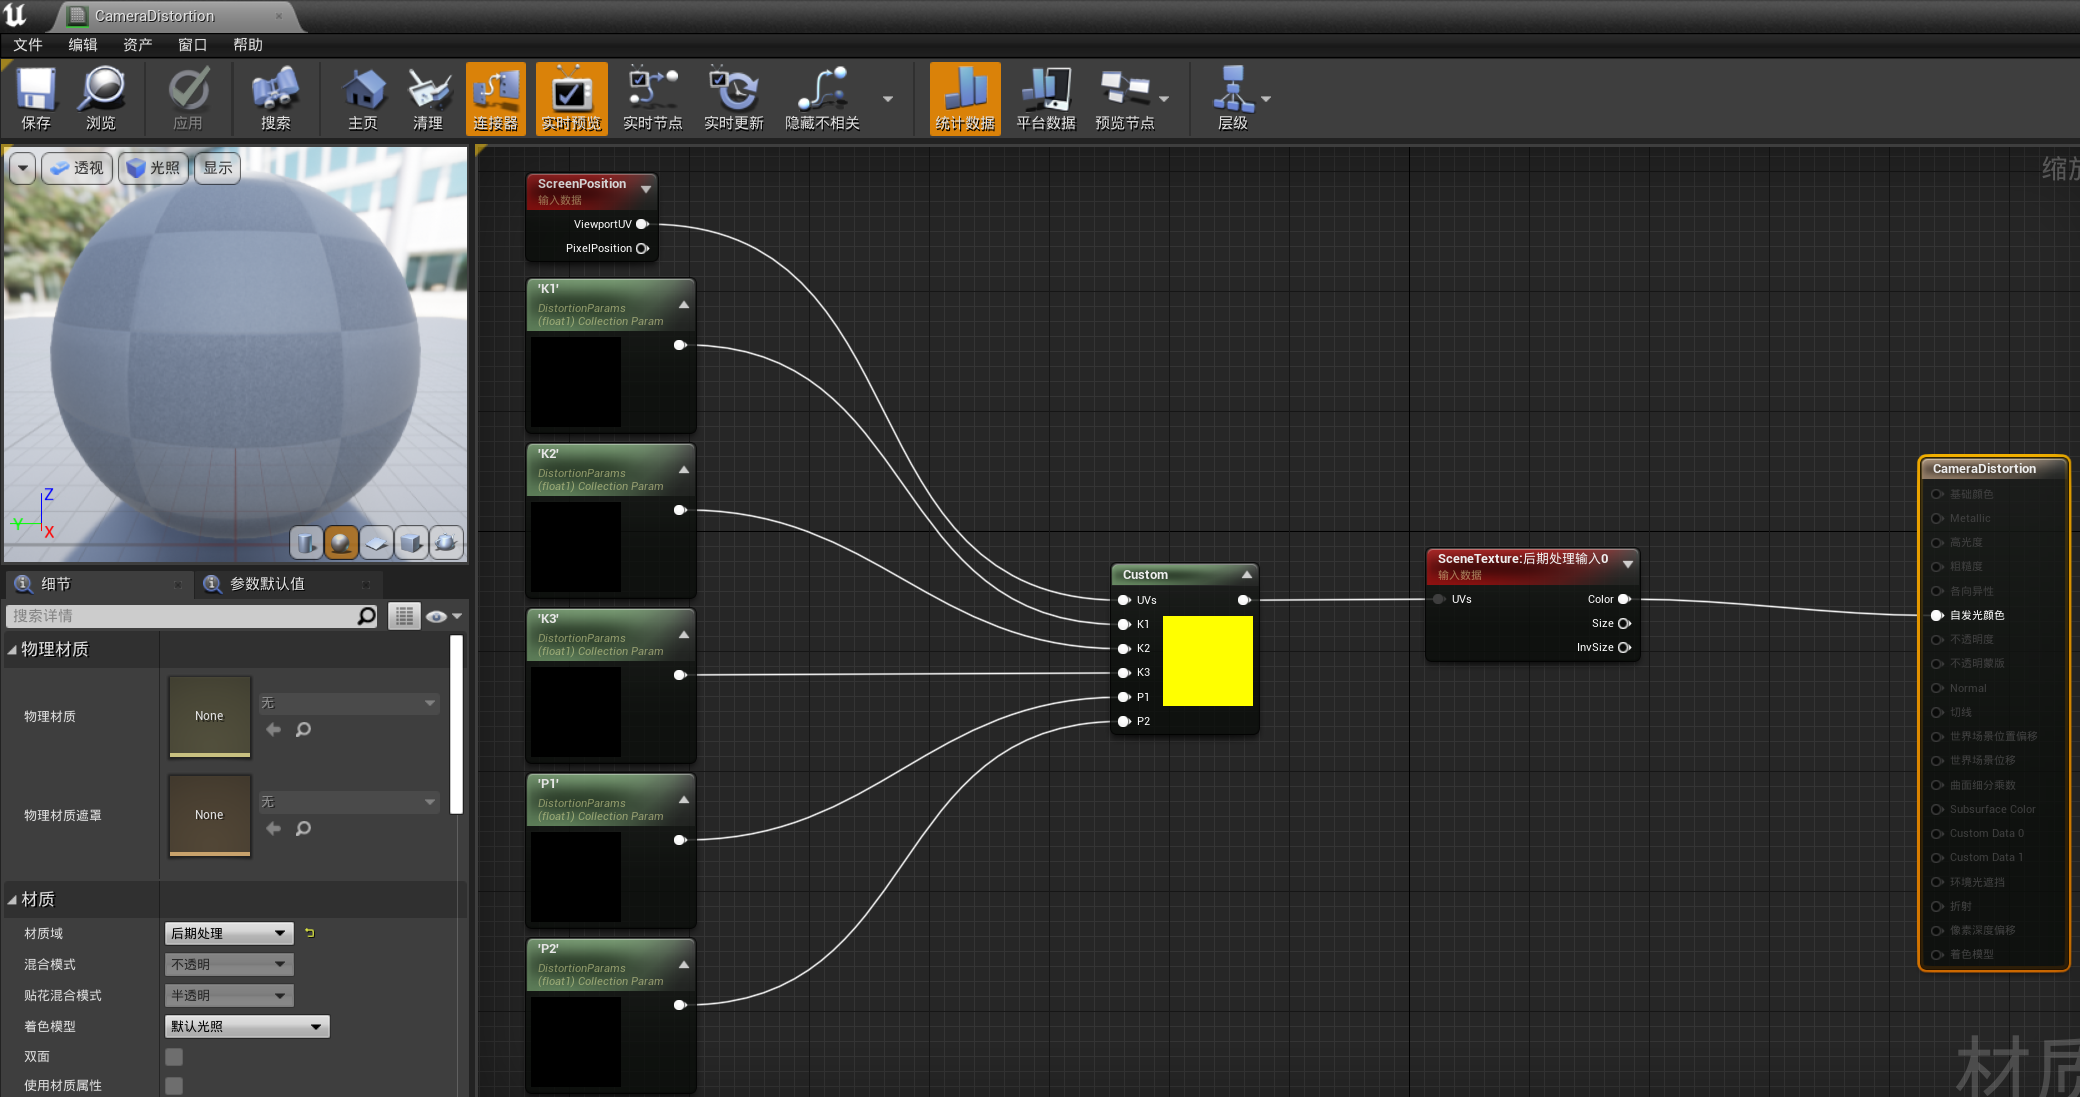
重点是其中的Custom节点:
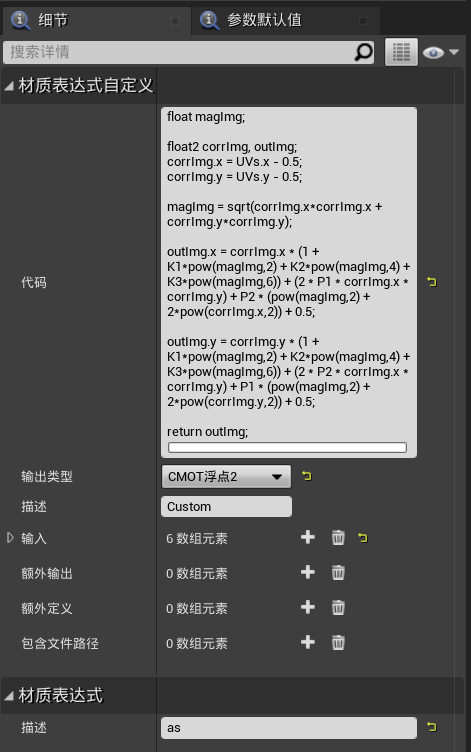
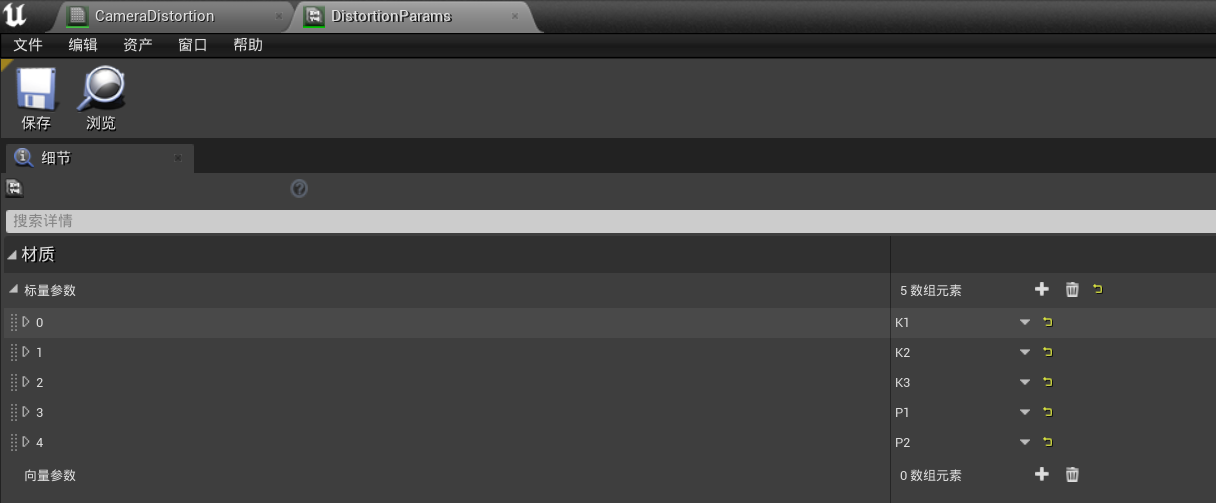
Custom节点通过Shader代码调整了输入的UV。至于输入的K1、K2等参数,点击后可以看到它们读取自DistortionParams资产:
补充
翻了下AirSim的github,发现了此feature对应的pull request。作者提到此功能目前只对Scene也就是RGB相机有效,实际测试时对Scene、Infrared、OpticalFlowVis是有效的;对于Segmentation、SurfaceNormals、DepthVis无效;至于DepthPlanar、DisparityNormalized、OpticalFlow生成的pfm格式图片,未确定是否有畸变。
从代码上来看,明明每种图片类型对应的capture_都设置了Post Process Material,为什么只有部分类型的图片有畸变呢?
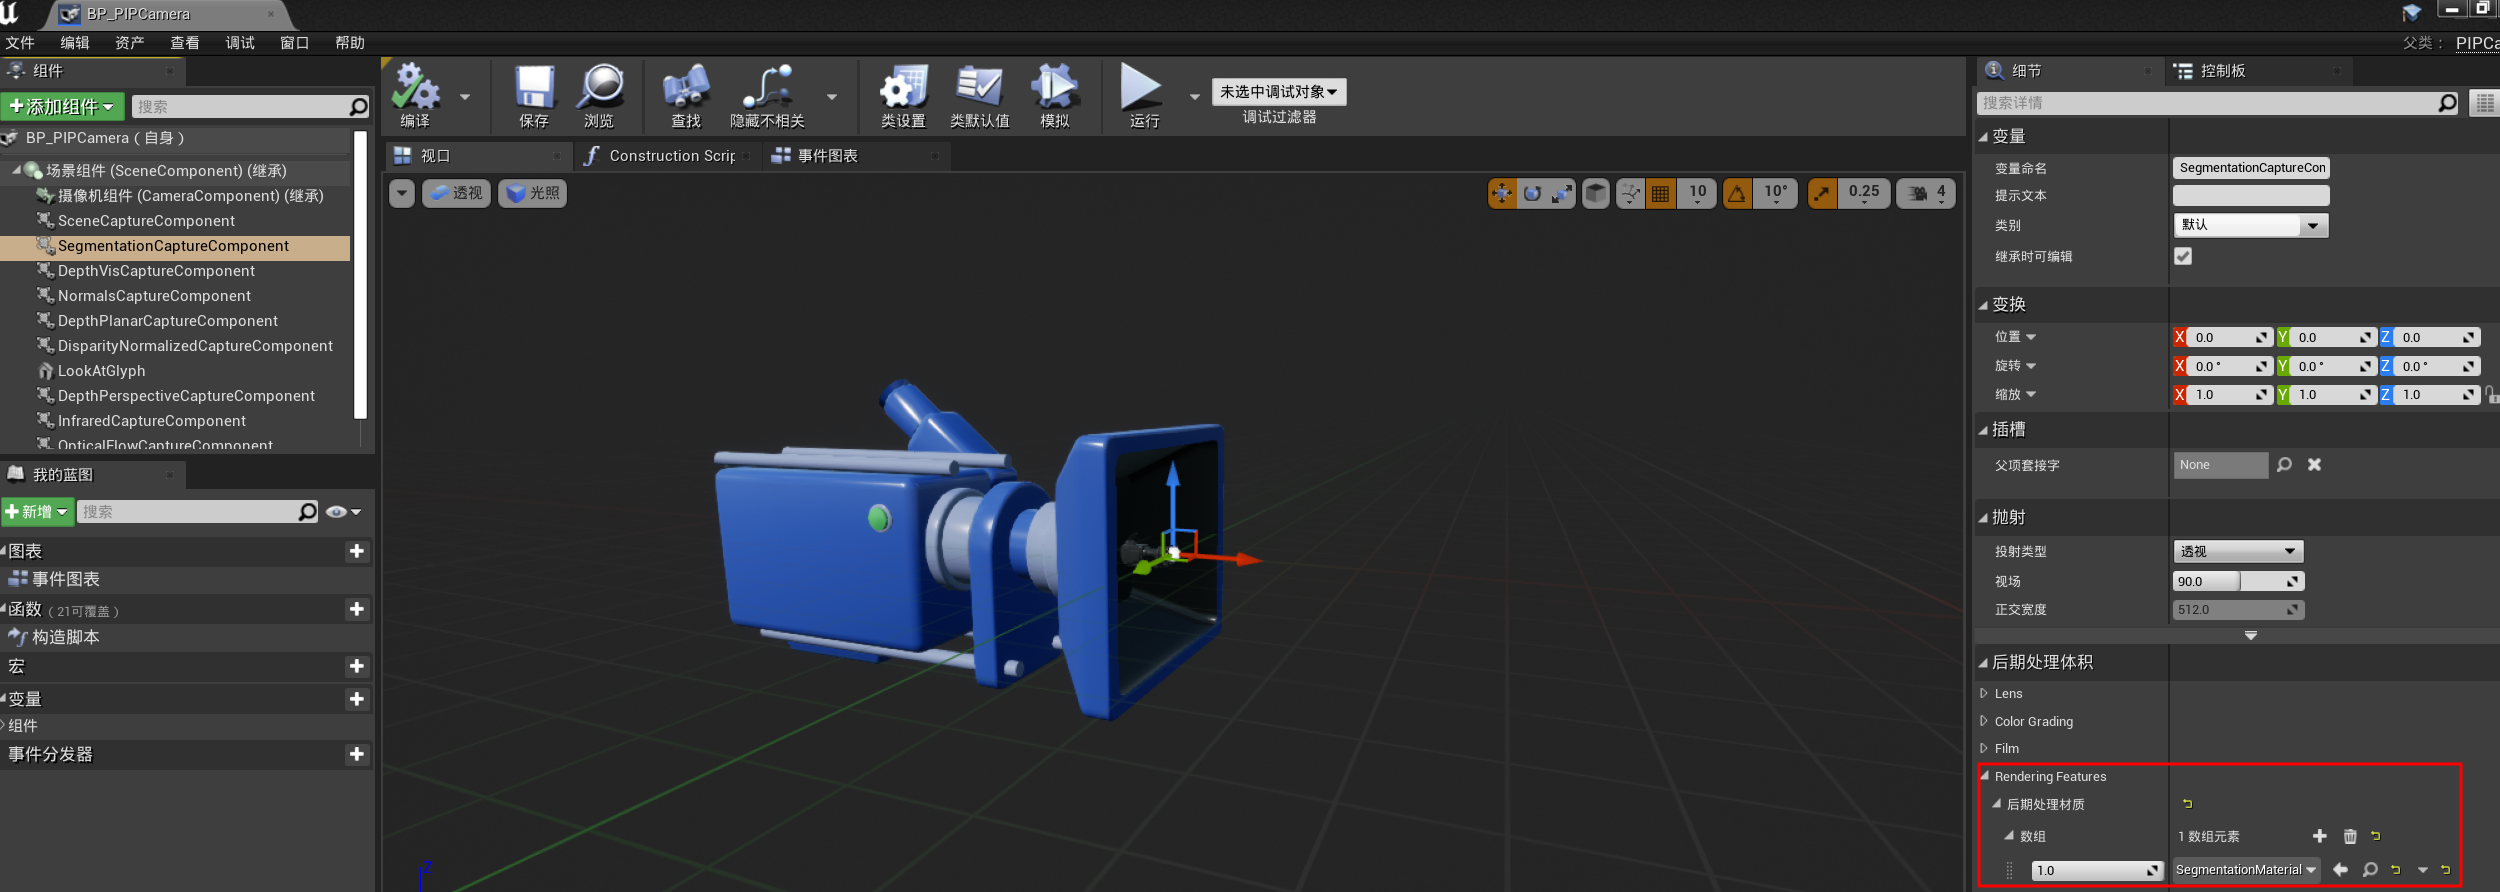
除了畸变,打开<path-to-project>/Plugins/AirSim/Content/Blueprints/BP_PIPCamera.uasset对应的蓝图后可以发现,除了Scene以外,其余类型的图片比如DepthPlanar、DepthPerspective等也是通过Post Process Material实现的。